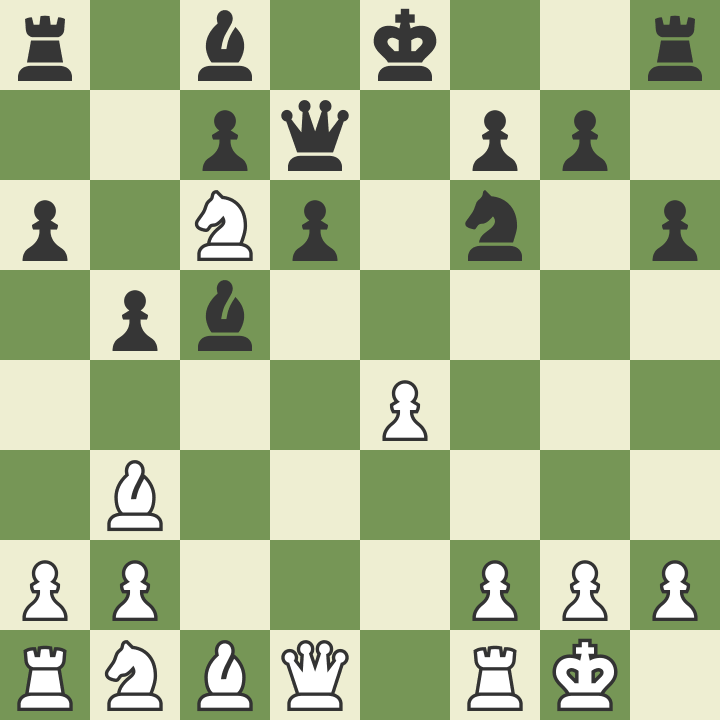
Morphy Defense, Caro, Graz Variation
e4e5Sf3Sc6Lb5a6La4b5Lb3Lc5
Hitta draget!

Vit har ett bra drag att göra och kan vinna minst en bonde.
e4e5Sf3Sc6Lb5a6La4b5Lb3Lc5

Vit har ett bra drag att göra och kan vinna minst en bonde.
e4e5Sf3Sc6Lb5a6La4Sf6O-Ob5Lb3Lc5
e4e5Sf3Sc6Lb5a6La4Sf6O-Ob5Lb3Lc5
Arkhangelsk #1
1. e4e52. Sf3 Sc63. Lb5a64. La4 Sf6 5. O-O b5 6. Lb3 Lc5
This move is the start of the Arkhangelsk Variation in the Ruy Lopez. Black's idea is pretty straightforward: all pieces should be developed to the most active positions, and once White occupies the centre Black is ready to attack it with all pieces. The main downsides are that Black will have to lose time by moving the bishop again (after White pushes c3 and d4) and, more importantly, that with the bishop stuck on the queenside the Black king will miss an important defender. Therefore our idea here as White is often connected to attacking the Black king.
7. c3
The most logical move, preparing to occupy the centre with d4 later on.
7... d68. a4!
A very important move. A key part of our plan here is to attack on the kingside, but first we are trying to disturb Black on the queenside. The move a4 is especially important as it forces Black to make a very tough choice of how to stop the threat of axb5 next.
8... Tb8
The absolute mainline. By stepping away from the a8-square the rook is no longer hanging, meaning that Black after axb5 can safely recapture with the pawn. The downside is that the move Rb8 in itself does not really contribute to the development as much as Bb7 or Bg4 would have done.
9. d4 Lb6 10. a5!
At first glance a very surprising move. On the last move we were trying to attack Black on the queenside, and now we are instead closing the queenside down. If we look at it on a move-by-move basis it does indeed seem illogical, but what matters here is our overarching strategy of attacking on the kingside. By playing 10.a5 we are achieving two very important things:
we are forcing Black's bishop even further away from the kingside.
Closing the queenside means that Black will find it much harder to generate counterplay on that side, giving us an easier time to focus only on our centre- and kingside play.
10... Sxa5
This looks possible at first sight, but removing the knight from the centre lets us break through before Black has time to get the king into safety.
11. Txa5!
It's all about time! We give up the exchange, but in return, we get a huge initiative.
11... Lxa5 12. dxe5 Sg4
In fact, this is the only move to not lose material at once.
13. Lg5!
Increasing the pressure. We should absolutely not let Black castle so every move should be an attacking one.
13... f6
The only move that doesn't lose material immediately, but not enough.
14. exf6 gxf6 15. Lh4
The simplest. Black's king is now stuck in the centre forever and we are in no great rush to break through. On the next move, we can increase the pressure with Nd4 with all sorts of knight jumps coming up next. Black will not survive for many moves here. Arkhangelsk with Rb8-Black's old mainline.
Arkhangelsk #2
1. e4 e5 2. Sf3 Sc6 3. Lb5 a6 4. La4 Sf6 5. O-O b5 6. Lb3 Lc5
This move is the start of the Arkhangelsk Variation in the Ruy Lopez. Black's idea is pretty straightforward: all pieces should be developed to the most active positions, and once White occupies the centre Black is ready to attack it with all pieces. The main downsides are that Black will have to lose time by moving the bishop again (after White pushes c3 and d4) and, more importantly, that with the bishop stuck on the queenside the Black king will miss an important defender. Therefore our idea here as White is often connected to attacking the Black king.
7. c3
The most logical move, preparing to occupy the centre with d4 later on.
7... d68. a4!
A very important move. A key part of our plan here is to attack on the kingside, but first we are trying to disturb Black on the queenside. The move a4 is especially important as it forces Black to make a very tough choice of how to stop the threat of axb5 next.
8... b4
A very rare move, that I have employed myself a few times as Black, but more notably used by the great Vladimir Kramnik in a game against Nepomniachtchi in 2018. The idea is to immediately stop White from opening up the a-file, meaning that the a7-square will be safe for the bishop. The downside for Black is that they lose a lot of flexibility with the queenside pawns, and for instance, the c4-square is now forever in White's hands. That also means that later counterplay with ...c5 is less strong, as the typical follow-up ...c4 is not available due to the pawn already being on b4.
9. d4 La7
The natural follow-up to 8...b4. Compared to 8...Rb8 we no longer have the option of axb5.
10. Le3
I recommend playing a similar setup to what we did against 8...Rb8. However, with Black already having played ...b4 we are less concerned with ...Bg4, so we can for the time being leave h3 out.
10... O-O 11. Sbd2 bxc3
Black should make this trade at some point, as Black is much more likely to use the b-file than White.11...g412.h3 is similar to the mainline, the main difference being that White can consider taking cxb4 at some point later on if Black insists on never trading on c3.
12. bxc3 Lg4
The most natural reaction when White delays h3, but it does not work out so well here.
13. h3 Lxf3
13...Lh5 is a very risky decision as the bishop might end up being completely out of play on h5. After14.c2 I believe we have a very comfortable position, just playing in the centre and on the queenside with the h5-bishop being a long term issue.
14. Sxf3 Sxe4
This does win a pawn, but as so often in the Arkhangelsk the poor placement of the a7-bishop gives White excellent strategic compensation.
15. Dd3 Sf6 16. Lg5
Black's extra pawn is not at all felt. Our immediate threat is Bd5 with a devastating pin on the c6-knight. The attempt to liquidate by16...e4 leaves us with nice pressure in the ending after17.xf6exd318.xd8xd819.fe1. The a7-bishop is still very far from entering the game.
Probably Black's best bet instead is to play 16...Tb8, but after 17.Ld5 Se7 18.Lxf6 gxf6 19.Le4 the light squares around Black's king are very weak and we can increase the pressure with moves like Nh4.
1. e4 e52. Sf3 Sc6 3. Lb5 a6 4. La4 Sf6 5. O-O b5 6. Lb3 Lc5
This move is the start of the Arkhangelsk Variation in the Ruy Lopez. Black's idea is pretty straightforward: all pieces should be developed to the most active positions, and once White occupies the centre Black is ready to attack it with all pieces. The main downsides are that Black will have to lose time by moving the bishop again (after White pushes c3 and d4) and, more importantly, that with the bishop stuck on the queenside the Black king will miss an important defender. Therefore our idea here as White is often connected to attacking the Black king.
7. c3
The most logical move, preparing to occupy the centre with d4 later on.
7... d68. a4!
A very important move. A key part of our plan here is to attack on the kingside, but first we are trying to disturb Black on the queenside. The move a4 is especially important as it forces Black to make a very tough choice of how to stop the threat of axb5 next.
8... Lb7
The second most popular move in the position. Black develops a piece while defending against the threat of axb5 at the same time. The downside of ...Bb7 is that the bishop is committed to b7 very early, most importantly meaning that Bg4 is no longer an option for Black, but also that a potential defender of the kingside is further away. In recent years Vishy Anand has been one of the main defenders of Black here, but lately many other top GMs have started playing the line, for instance, Levon Aronian.
9. d4
A few months ago I tried9.d3 against Levon Aronian myself, but occupying the centre is clearly the most ambitious way to play.
9... Lb6 10. Le3!?
Very, very rare! Usually White plays Bg5 either here or after Re1. It does make a lot of sense to play Bg5 once Black has committed to ...Bb7, as the kingside is less defended, but the lines are long and complicated, and seem to end up OK for Black. Therefore I am recommending this rare move. It was played once in an online game between Vachier-Lagrave and Aronian, and a few other games, but in comparison to the Bg5-setups there is almost no theory. In some sense Black has gained time, as ...Bb7 is developing a piece whereas a move like ...Rb8 isn't. On the other hand we didn't have to play h3 ourselves. Overall I believe the positions to be fun and interesting for White!
10... exd4
Aronian's choice and the most critical move.
11. cxd4 La5
Aronian's choice.
12. Sbd2!?
Simply defending e4, intending Bc2 next. Vachier Lagrave instead played 12. Lc2, which allowed 12...Sxe4 and although he got some compensation, it wasn't enough to push for an edge.
12... Sxb3 13. Dxb3 O-O
Black has won the bishop pair, and normally this would be enough to discard our position. However, here Black has had to waste a lot of time to take it, and the lack of pieces around their king gives us the potential for an attack.
14. a5!?
Making sure that the queenside is blocked, so that we can focus our full attention on the kingside and the centre.
14... La7 15. Lg5
The key idea. The pin is very annoying, and pushing h6 and g5 is very risky with so many pieces stuck on the other side of the board.
15... h6 16. Lh4 Te8
The most flexible move.
17. Tae1!?
We use this rook, as the other one might come in handy on the f-file in case we later sacrifice on g5 and push the e- and f-pawns. Additionally, the f2-pawn is protected which can turn out to be useful in case Black takes on d4 later.
17... g5 18. Sxg5 hxg5 19. Lxg5
is still very dangerous for Black.
19... Lxd4 20. Dg3 Kf8 21. Dh4!
followed by Nb3 or Nf3, kicking the bishop away. One funny line that shows the dangers for Black is:
21... Te6 22. Sb3 Lxb2 23. e5!
cutting the bishop off from the defense of the f6-knight. The rest of the lines are certainly not necessary to know, but some of them are very nice, so I'll show them anyway:
23...dxe5 24.Td1 Td6
24...De7 25.Dh8+ wins the queen.
25. Sc5! Lc6
25...Txd1 26.Dh8+ wins immediately, as the rook no longer defends f6.
26. Sd7+!! A very, very nice geometrical motif. The point is to block the queen's path from d6.26...xd7
26...Lxd7 27. Lxd6 cxd6 28.Lxf6
27.Lxf6 Txf6 28. Txd7 Lxd7 29. Dxf6 and this leaves us with too much material.